
The other day I blogged about my home office decorating project: Craft Diva Decorates Home Office. I mentioned the fabric covered memo board that I made for the office in that post. Here are the instructions on how to make your own French inspired, fabric covered memo board.

Fabric Covered Memo Board Supply List
- Wood frame cork board
- Measuring tape
- Old sheet or towels
- Can of spray glue – I used Elmer’s from JoAnn Fabrics
- Quilt batting – I used cotton, but polyester would work too
- Decorative fabric – I found brocade fabric for 50% off in the clearance section at JoAnn’s. It was the perfect color for my home office decorating project.
- Ribbon – satin, silk, grosgrain, etc…
- Scissors
- Metal upholstery tacks
- Hammer
- Staple gun – with small 1/4 inch long staples
- Screw driver
- Hanging hardware – to attach the finished memo board to the wall


Instructions for Making French-style Memo Board
- Measure the cork board so you will know how much fabric to buy. I bought my fabric on sale, and got what was left on the bolt. I had enough to cover the front and back of the cork board, and enough leftover to make matching pillows for the home office futon.
- Spray glue is a bit messy. You need to cover your work surface with a drop cloth, or old sheet, or a couple of old towels. I skipped this step, and the spray glue got all over the carpet. Luckily I have a carpet cleaner and was able to clean the rug as soon as I finished making the memo board.
- Cut a piece of the quilt batting to fit the front of the cork board.
- Spray the front of the cork board with spray glue, and attach the piece of batting.
- Cut a second piece of batting that is large enough to cover the front of the board, wrap around the sides and attach to the back of the cork board. I used spray glue to attach the second layer of batting to the front of the board, and the staple gun to attach the batting to the back of the board. Trim the corners to get rid of excess batting.
- Cut a piece of your decorative fabric which is large enough to cover the front of the board, wrap around the sides and attach to the back of the board. Use the staple gun to attach the fabric to the back of the board. Pull the fabric taught, while wrapping it around the sides.
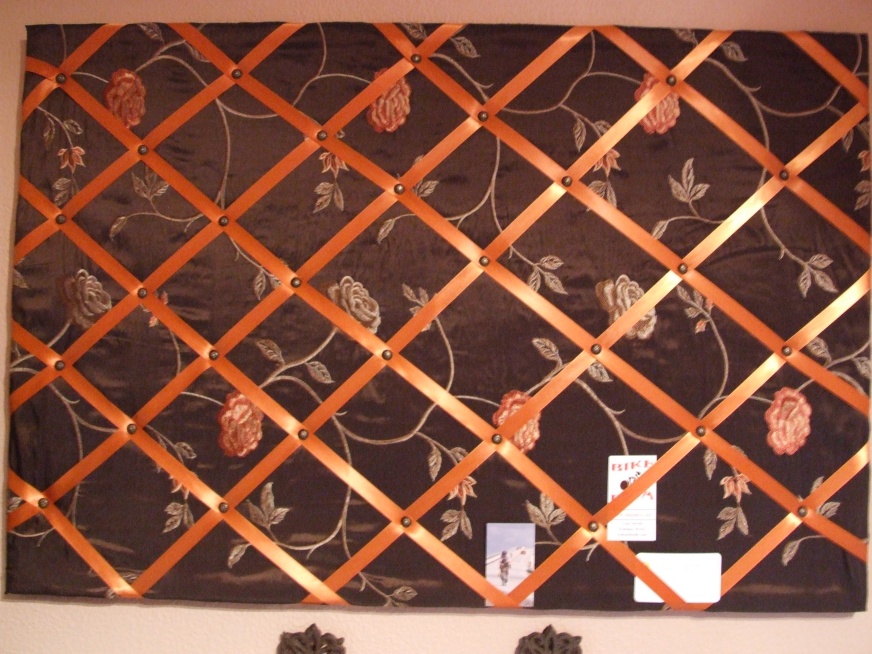
- Attach the decorative ribbon to the front of the board in a diagonal pattern. Wrap each piece of ribbon around the sides of the board, and attach to the back of the board using the staple gun.
- Attach decorative upholstery tacks to the front of the board, where 2 pieces of ribbon cross over one another. Use a hammer, if necessary.
- Cut a piece of fabric that is just slightly larger than the back of the cork board.
- Fold the edges of the fabric under, then attach the fabric to the back of the board using the staple gun.
- Attach the hanging hardware to the back of the memo board using a screw driver.
- Attach 2 screws to the wall, where you want to hang the memo board.
- Hang the memo board up, and enjoy!


To Measure or Not to Measure
I had a heck of a time trying to figure out how to equally space the ribbons on the front of the board. I measured it a couple of times, then tried to add ribbons evenly spaced on the board. But I kept redoing it because I couldn’t get the math to work out. I’m an artist, not a rocket scientist – HA! So I ended up going for the free form look, and adding ribbons wherever. So my diagonal placement is not equal, but I think it came out looking okay. You’re going to be adding a lot of items to the memo board, so it doesn’t really bother me that mine isn’t perfect.

Take care,
Lynn Smythe of The Creative Cottage
© 2015, The Creative Cottage. All rights reserved. Unauthorized use and/or duplication of this material without express and written permission from this blog’s author and/or owner is strictly prohibited.


+ There are no comments
Add yours