
Art, Craft and Jewelry Projects
Over the years I’ve experimented with a variety of bead art, arts and crafts, and jewelry-making techniques including seed bead earrings, fused glass, altered art, macrame, sewing, and more. I even took a 6-part class at a local bead shop to become a Certified Art Clay Silver artist. One of my favorite techniques I learned in that class was how to use unglazed ceramic bisque beads as a base for creating one-of-a-kind silver metal clay beads.
I even thought I could do a short production run of a few of the easy-to-replicate styles to sell online and at local craft shows. I found a wholesale supplier and ended up purchasing a bunch of unglazed ceramic bisque beads to use as a base for my metal clay beads. Bisque refers to unpainted pottery that has been fired but hasn’t been decorated or glazed. Bisque firing takes a raw clay item, which has been dried leather hard and fires it in the kiln turning it into a hard ceramic item that is ready for painting, decorating and glazing.

Unglazed Ceramic Beads
Since I bought the ready-to-paint ceramic bisque beads in bulk, I ended up with a ton of beads on hand so I thought I’d buy some ceramic glazes and paint a few beads just for sh*ts and giggles. I had no previous experience with glazing ceramics and had to do a bit of research. But I taught myself how to fuse glass in the kiln years ago, so I was pretty sure I’d be able to figure out how to glaze and fire the unpainted ceramic beads.
I went on-line to research how-to glaze and fire bisque beads. At the time (this goes back a few years) I couldn’t find any information on how to fire bisque beads but I did find lots of information on glazing and firing bisque items, such as bowls and plates, so I used that as a general guideline. Most of the ceramic bisque underglazes I purchased didn’t come with any directions except to fire them to cone 06, which is around 1798 degrees Fahrenheit. I did a search on how-to fire to cone 06 and found some basic information which I translated to a firing schedule using my digitally controlled kiln.

Firing Schedule for Bisque Beads
I am posting up this schedule on how I fired my bisque beads after coating them with various ceramic glazes. I am assuming you have a basic knowledge of how to operate your own kiln – I have a Jen Ken kiln with a digital controller.
I love that kiln, it’s one of the best pieces of equipment I ever purchased for my studio. I can fuse and slump glass in the kiln, fire metal clay projects (i.e. Art Clay Silver or Precious Metal Clay), fire copper enamel or fine silver enamel pieces and even glaze a variety of bisque projects in the kiln.

- RA = ramp temperature per hour
- F = target temperature in degrees Fahrenheit
- H = time to hold at target temperature
- RA1 = 150
- F1 = 300
- H1 – 0
- RA2 = 400
- F2 = 1500
- H2 = 0
- RA3 = 120
- F3 = 1800
- H3 = 10
- RA4 = 150
- F4 = 400
- H4 = 0

Translation of Bead Firing Schedule
Once the kiln is turned on, choose the correct firing program and start the kiln. The firing schedule, listed above, heats the kiln at 150 degrees per hour until it reaches 300 degrees. Then the kiln heats up 400 degrees per hour until it reaches 1500 degrees. Then it heats up 120 degrees per hour until it reaches 1800 degrees and it holds at 1800 degrees for 10 minutes. Then the kiln cools down 150 degrees per hour until it reaches 400 degrees.
Then you have to let the kiln cool down to room temperature before opening it up and removing the glazed ceramic beads. The total firing time takes approximately 17 hours. That seems like a long time but it takes quite some time to safely and slowly heat the kiln to 1800 degrees and it takes quite a while for the kiln to cool back down to room temperature.


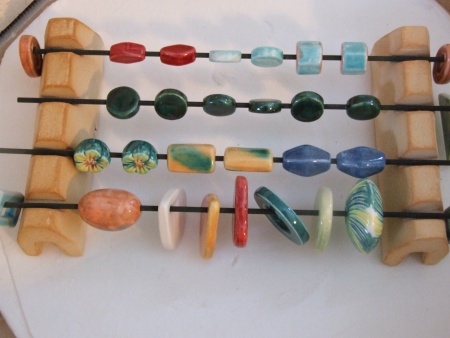
Creative Cottage Ceramic Beads
I was really pleased with how my glazed ceramic beads came out. I plan on using them in a variety of jewelry pieces including necklaces, bracelets and earrings. I’ll eventually take photos of some of my beaded ceramic jewelry sets and glazed ceramic bead sets to sell on my Creative Cottage store.


Let’s Keep in Touch
Do you have any tips or tricks you’d like to share? Leave a comment on this post or shoot me an email: info@thecreativecottage.net and I just might feature your story in a future blog post.
Take care,
Lynn Smythe
Founder and Chief Blogger
The Creative Cottage
© 2021, The Creative Cottage. All rights reserved. Unauthorized use and/or duplication of this material without express and written permission from this blog’s author and/or owner is strictly prohibited.
Disclosure: This post may contain ads or affiliate links, which means we may receive a commission if you click a link and purchase something that we have recommended. While clicking these links won’t cost you any extra money, they will help us keep this site up and running! As an Amazon Associate, I earn from qualifying purchases. Please check out our disclosure policy for more details. Thank you!#CommissionsEarned


+ There are no comments
Add yours